
Pizza Delivery: Re-Heated!
Faking animation with LY-nimation on the Game Boy
If you recently saw the latest teaser for my game out there (which, if you haven't, go check it out!), At the start of it you might've noticed a pretty easy-to-miss effect that, if you're familiar with the Game Boy Color's hardware, you might think is impossible.

I love me some fancy VFX, hope that comes out clearly in this article.
This type of image stretching is, to be clear, not a thing the Game Boy can normally do. But then how does it do it? To explain that, we need a crash-course on how the Game Boy (and Game Boy Color) work when it comes to video.
As you can imagine, video is one of the big memory-munchers of the computer world - It simply takes a lot of memory to store a full image, let alone 60 moving images per second! For the original Game Boy, with a 160x144 display at 4 colors per pixel, that comes out to roughly 5.7KB per frame, and for the Game Boy Color, the rough estimate would be a whopping 43KB! And how much Video RAM does the Game Boy have? only 8KB (16KB on GBC), which has to store everything on display. Not only that, but drawing a bitmap like this without any extra processors would take a huge bite out of the CPU! So how do we cut down on the work needed?
Luckily, the Game Boy employs a similar solution that many other pre-3D systems take. Instead of storing one big image for the display, it stores small, re-usable chunks (normally called tiles) that can be pieced together in a canvas (normally refered to as a tile-map) to generate the final image. The tilemap can also be moved in both axis using the scroll registers (Keep this in mind, it will come back later!).
All this not only cuts down on memory usage, but also the required work from the CPU itself, since, while the GB does have a "GPU" of sorts (called the PPU), all it does is generate the image, the CPU still needs to write everything needed to VRAM.

Here we can see the tiles in VRAM, the Game Boy has enough memory to store 384 tiles at a time, while the GBC can store double that.
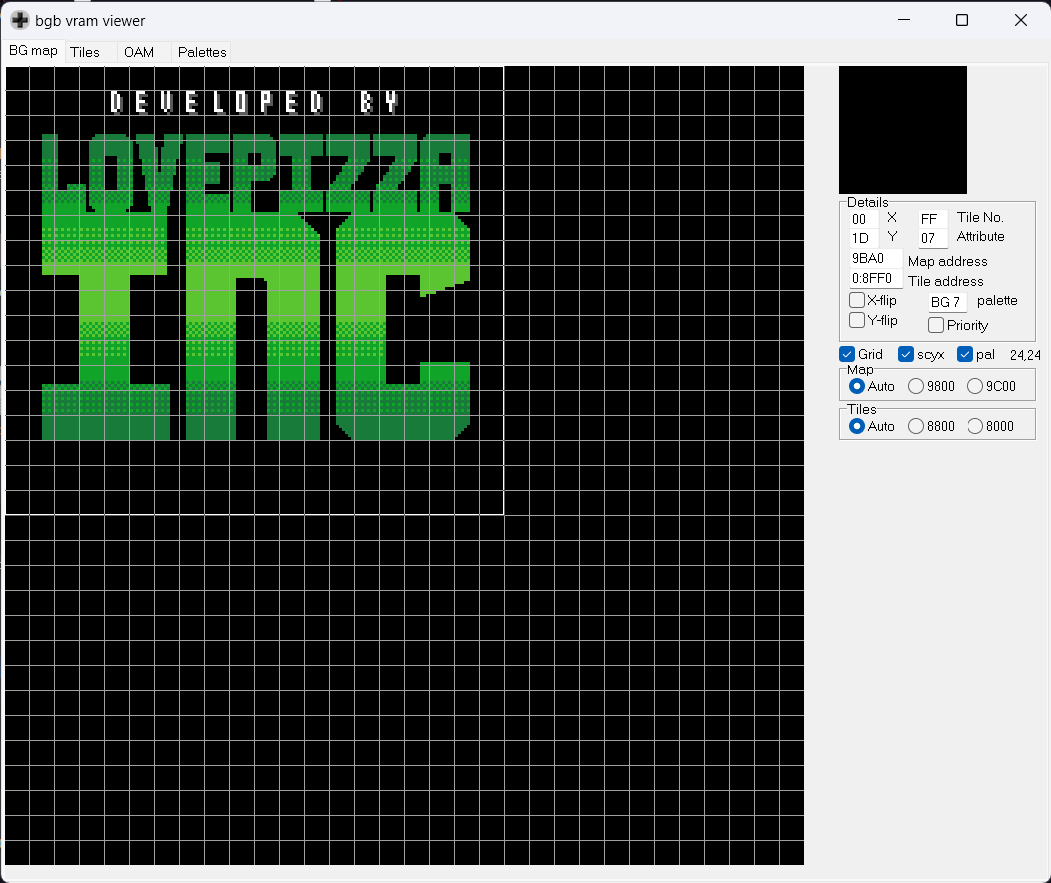
And here is the final tilemap! Since all this has to do is tell the PPU which tile is at which position, each cell only requires a byte in VRAM, meaning we can store a full screen of tiles in 360 bytes.
But there's still a missing piece in this... If you check the intro animation in a debugger like BGB's you might see the tiles and tilemap remain completely static throught... So the question is still up as to how the stretching happens. This part's a little trick that, while it sounds whack, it won't be as surprising once we finish explaining it.
If you're familiar with display tecnology of this era (like CRT's), you already know how things aren't rendered at once. A CRT generates an image by having a beam run from the top left of the screen to the bottom line, changing color at an insane speed to give the illusion of a full screen image (See? Another way to save on memory kinda!), this is so fast that the human eye usually can't percieve it. The Game Boy and Game Boy Color work in a similar way - With a "beam" running left to right, up to down generating each line of the screen (which we call a scanline). The main catch is that during this process, the PPU will take whatever it has in memory in that instant and render it. So... What if we changed those values really fast? You might start seeing how this is done.
What the game basically does is, during every single line of the screen, change the vertical scroll register to a different value, which the PPU then picks up and renders. Once we finish rendering a frame, with the right values placed in the register, we can give the illusion of vertical stretching! See? I told ya it was simple!
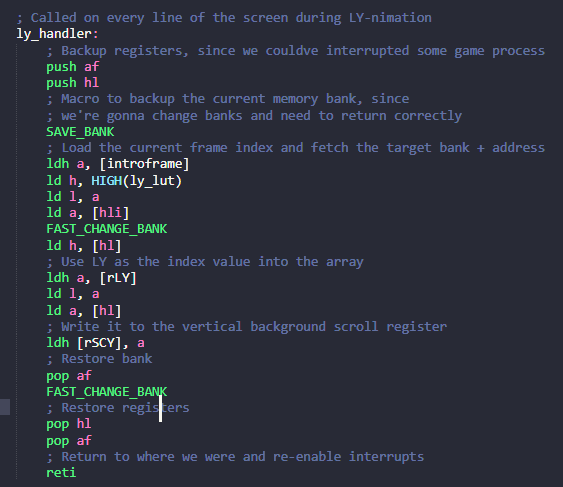
Here we can see the code that's called on every new line of the screen. I've tried commenting the code to help understand what's going on. You can see here where I got the LY-nimation name from! rLY is a neat register that tells you which line of the screen is currently being rendered, perfect for this job.
What isn't as simple is how to generate that data. While I could've done this manually, frame by frame (of which there are 100), I decided to at least try to automate the process. First, I opened up Blender and, using a lot of references and tutorials, animated a rectangle bouncing vertically. I set up everything so that the square would line up perfectly with the Love Pizza INC logo on the source image.
I'm no animator, but I'm pretty happy with how this came out.

Here's the final "reference" image - Crude, but usable.
After this, I imported all the frames into Aseprite and carefully stretched the LPI logo on top of the reference. This was extremely tedious, specially with all the tweaks I had to do to the animation. All that was left to do for the animation was exporting it into a GIF.

For some reason, the animation gets exported at a really slow speed, but you can already see the similarities with the final product.
With this "final" GIF in hand, I then wrote a python tool to take the source image (the one loaded into the Game Boy's VRAM) and the GIF and use both to generate a look-up-table for every frame. Basically what it does is slice each frame into 144 horizontal lines, look for a matching line in the source image and store that line's Y offset on the look-up-table. This is the value later read by the scanline code and fed to the vertical scroll register. This is also why I couldn't just render the LPI logo directly from Blender's export, since I need every line to only be vertically distorted and still exist in the source image - Blender's render often generated small artifacts that were interpreted as lines not present in the source image.
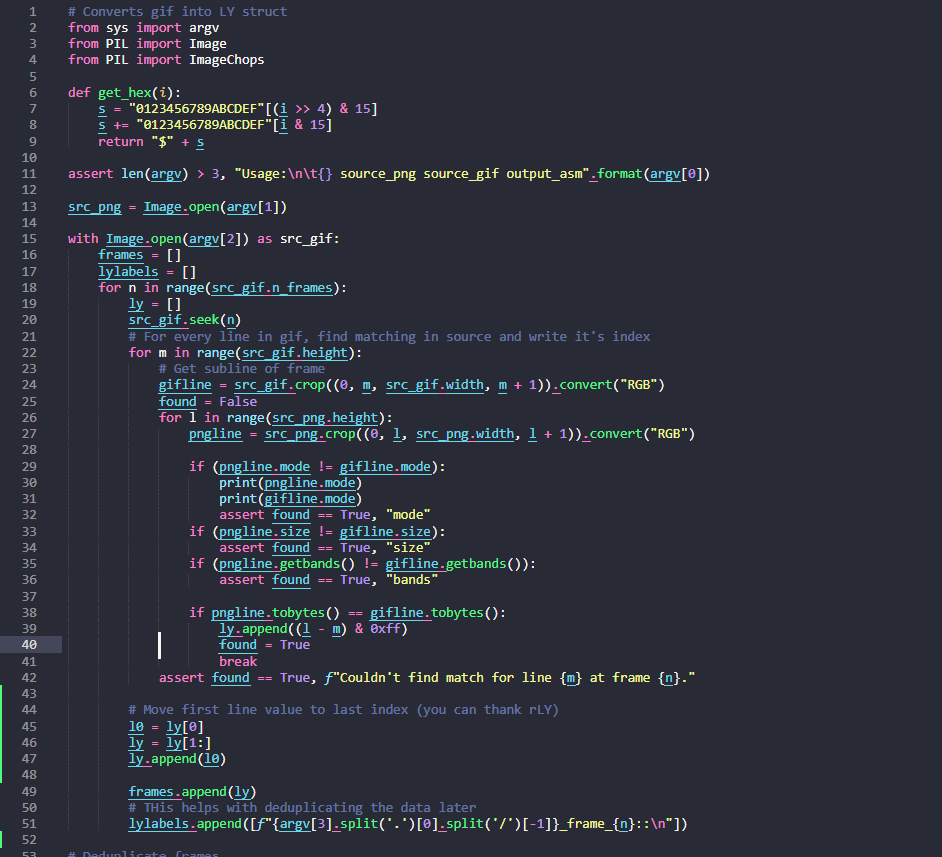
You might ask - Why is the first line's offset moved to the end of the array? Well, line interrupts start being triggered at the end of the first line, so to set the first line's offset, that has to be done previously - And since rLY starts at 0 rather than 1, to save on CPU time, the first line's offset is read last for the next frame with a different bit of code.
Finally, I had the animation working ingame! Originally I was using the Game Boy Color's double speed mode to make sure no lag happened (which would mess with the illusion a lot), but after testing with single speed mode (which eats up less battery, hence only used when needed) the CPU is just barely fast enough to do the job with no lag. The whole process for this only took a few days of coding, although I had previously been pondering on the feasibility of it for a few weeks. Overall, I'm happy with the final result and I'm excited for you all to see this and all the other effects I've crunched into the game once it's out!
Comments
Log in with itch.io to leave a comment.
excellent article, very well explained... The proof I managed to understand :). I think I'll steal the idea ;)
great article. I wish I could remember the name but it seems there was a game that used this concept to create the illusion of tiles that were less than 8 pixels high to squish more information on the screen at once
Yes, it's a very similar trick where you change the position of the background every 7 lines to squeeze a few more lines off the screen, that's what From Below Pocket does to squeeze more columns into the screen.